Security
Security is considered one of Fyno’s biggest selling points since we deal with the transmission of a lot of sensitive information and Personal Identifiable Information.
Therefore while implementing the Security features, a lot of consideration was put in, keeping Compliance as well as client data discretion in mind.
Fyno has 5 Security features that can be enabled for your account:
- Data Masking
- Data Payload Storage
- Approval Requests
- Secure Allowlist Endpoints
- Secure Media Storage
Before you enable any of these features, it is important to understand what each one does, to ensure your use case is being covered and you are achieving the security data protection.
Data Masking
Masking a piece of information means covering it. In the simplest of terms, masking is a 2-way feature that enables you to cover sensitive data points on the Fyno application when it’s being displayed.
When and How it Works?
Masking, when activated, will be implemented on the below 2 data points that we receive from you:
- Data Payload
- Destination
Fyno’s Masking feature works as below:
- Fyno receives an API request from your end with one or both of the above-mentioned data points.
- On receiving the API Request, if Masking is toggled on, then the data will be stored in the database as plain text format
- On viewing these data points on the Fyno application, they will be displayed in a masked format - xxxxx.
Enabling Masking
To enable the Masking feature for your account,
Once done, all your Data Payload and Destination details will be masked across the application. You can see this in the following places:
- Sent logs
- Notification Event Logs
- Workflow Logs
You will be able to see the masked data as a string of “xxxxx” where the sensitive information is supposed to be.
Data Payload Storage
You can decide whether you want to store the data payload you send to Fyno or not using this setting.
How it Works?
Data Payload storage, when activated, will be implemented on the below data point that we receive from you:
- Data Payload
- Payload sent to workflows.
Fyno’s Data Payload Storage feature works as below:
- Fyno receives an API request from your end with the data payload.
- On receiving the API Request, if Data Payload Storage is toggled on, then we will store the data payload at our end.
If its disabled, you won’t see any Placeholders data in the logs.
Enabling Data Payload Storage
To enable the Data Payload Storage feature for your account,
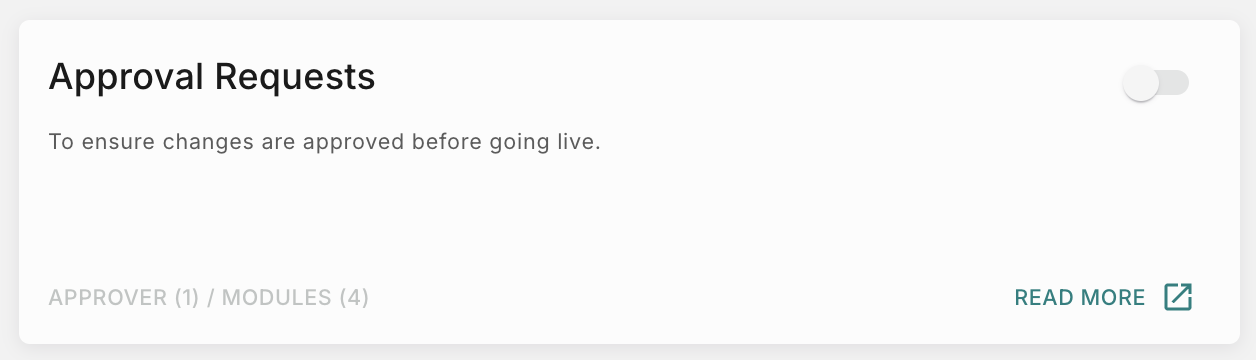
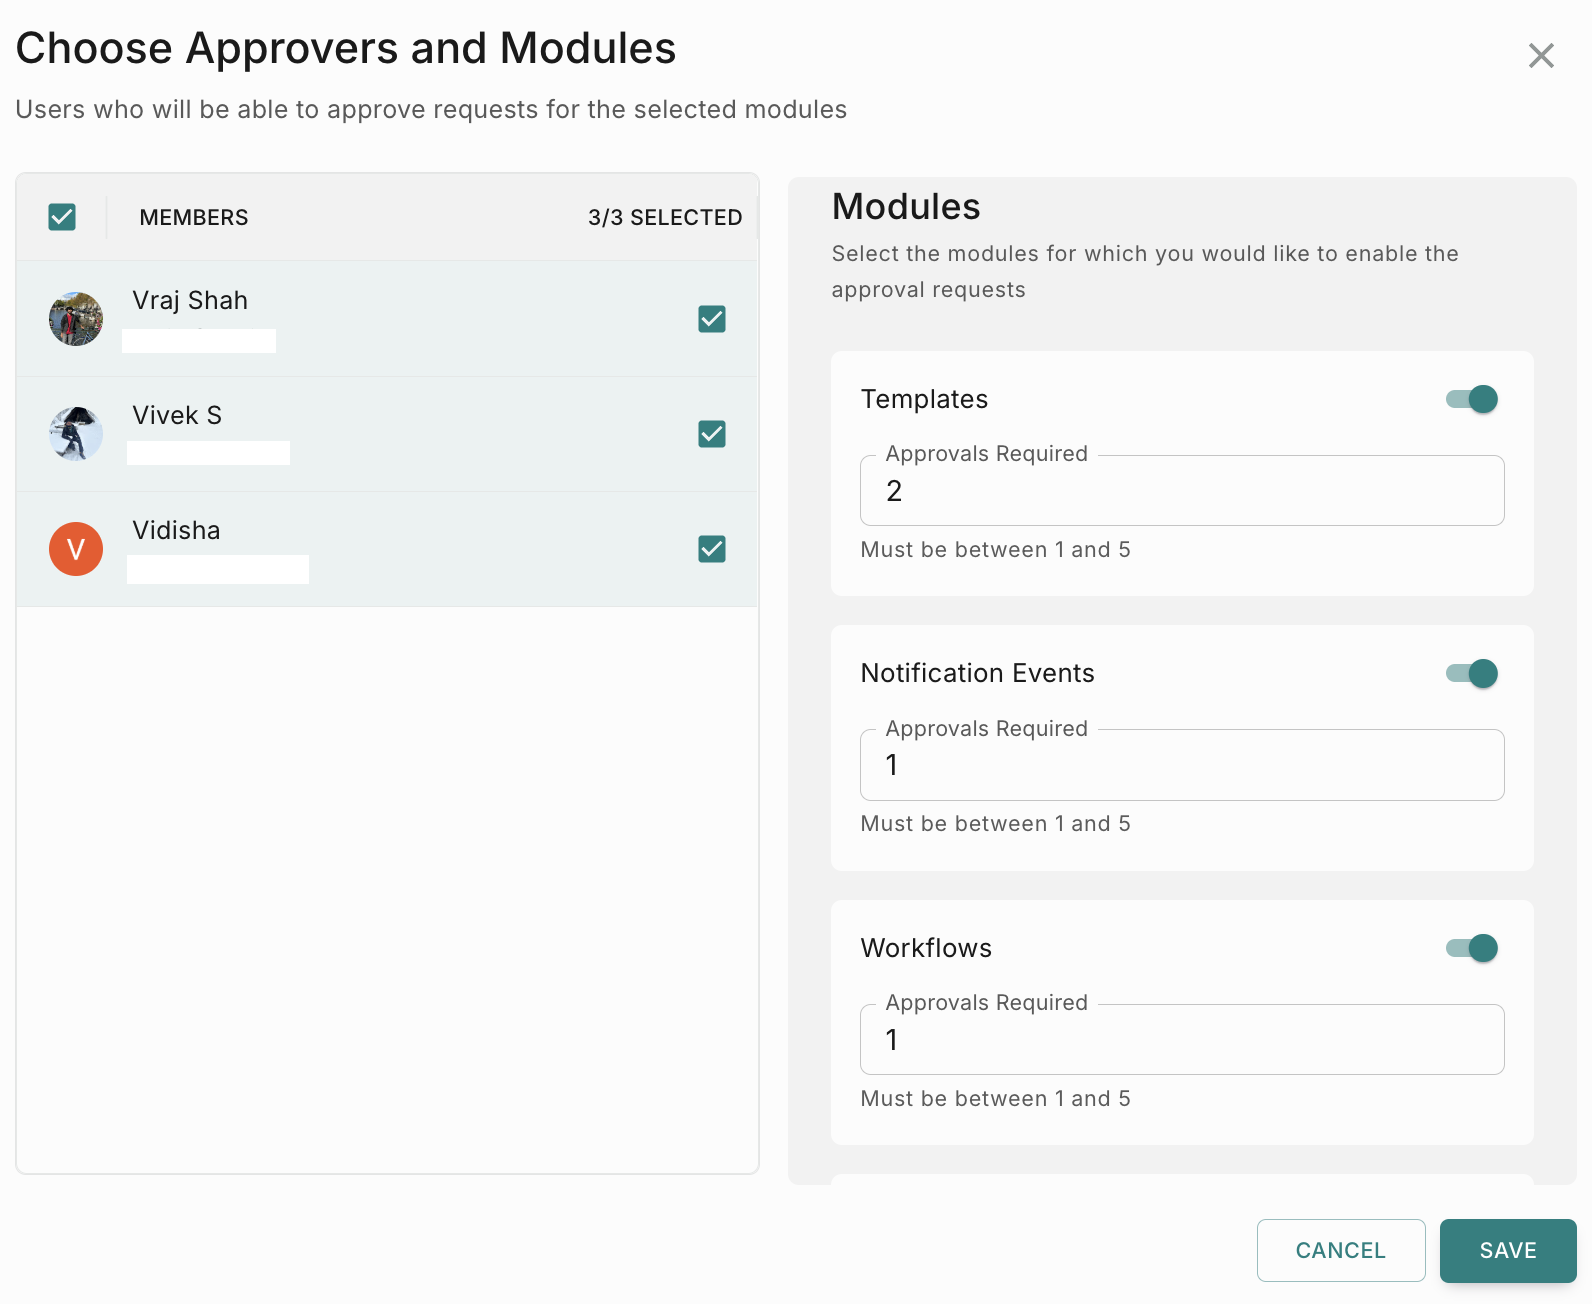
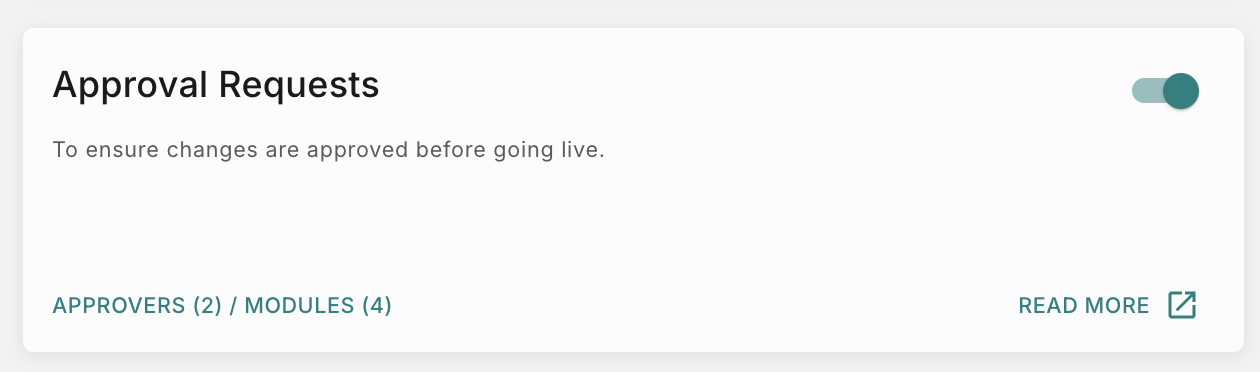
Approval
This feature will enable you to add a approval process when anyone promotes a feature from Test to Live. This additional step ensures to prevent incorrect or unintended communications from reaching users.
To enable Approval flow for Templates, Notification events and Workflows, follow the below steps.
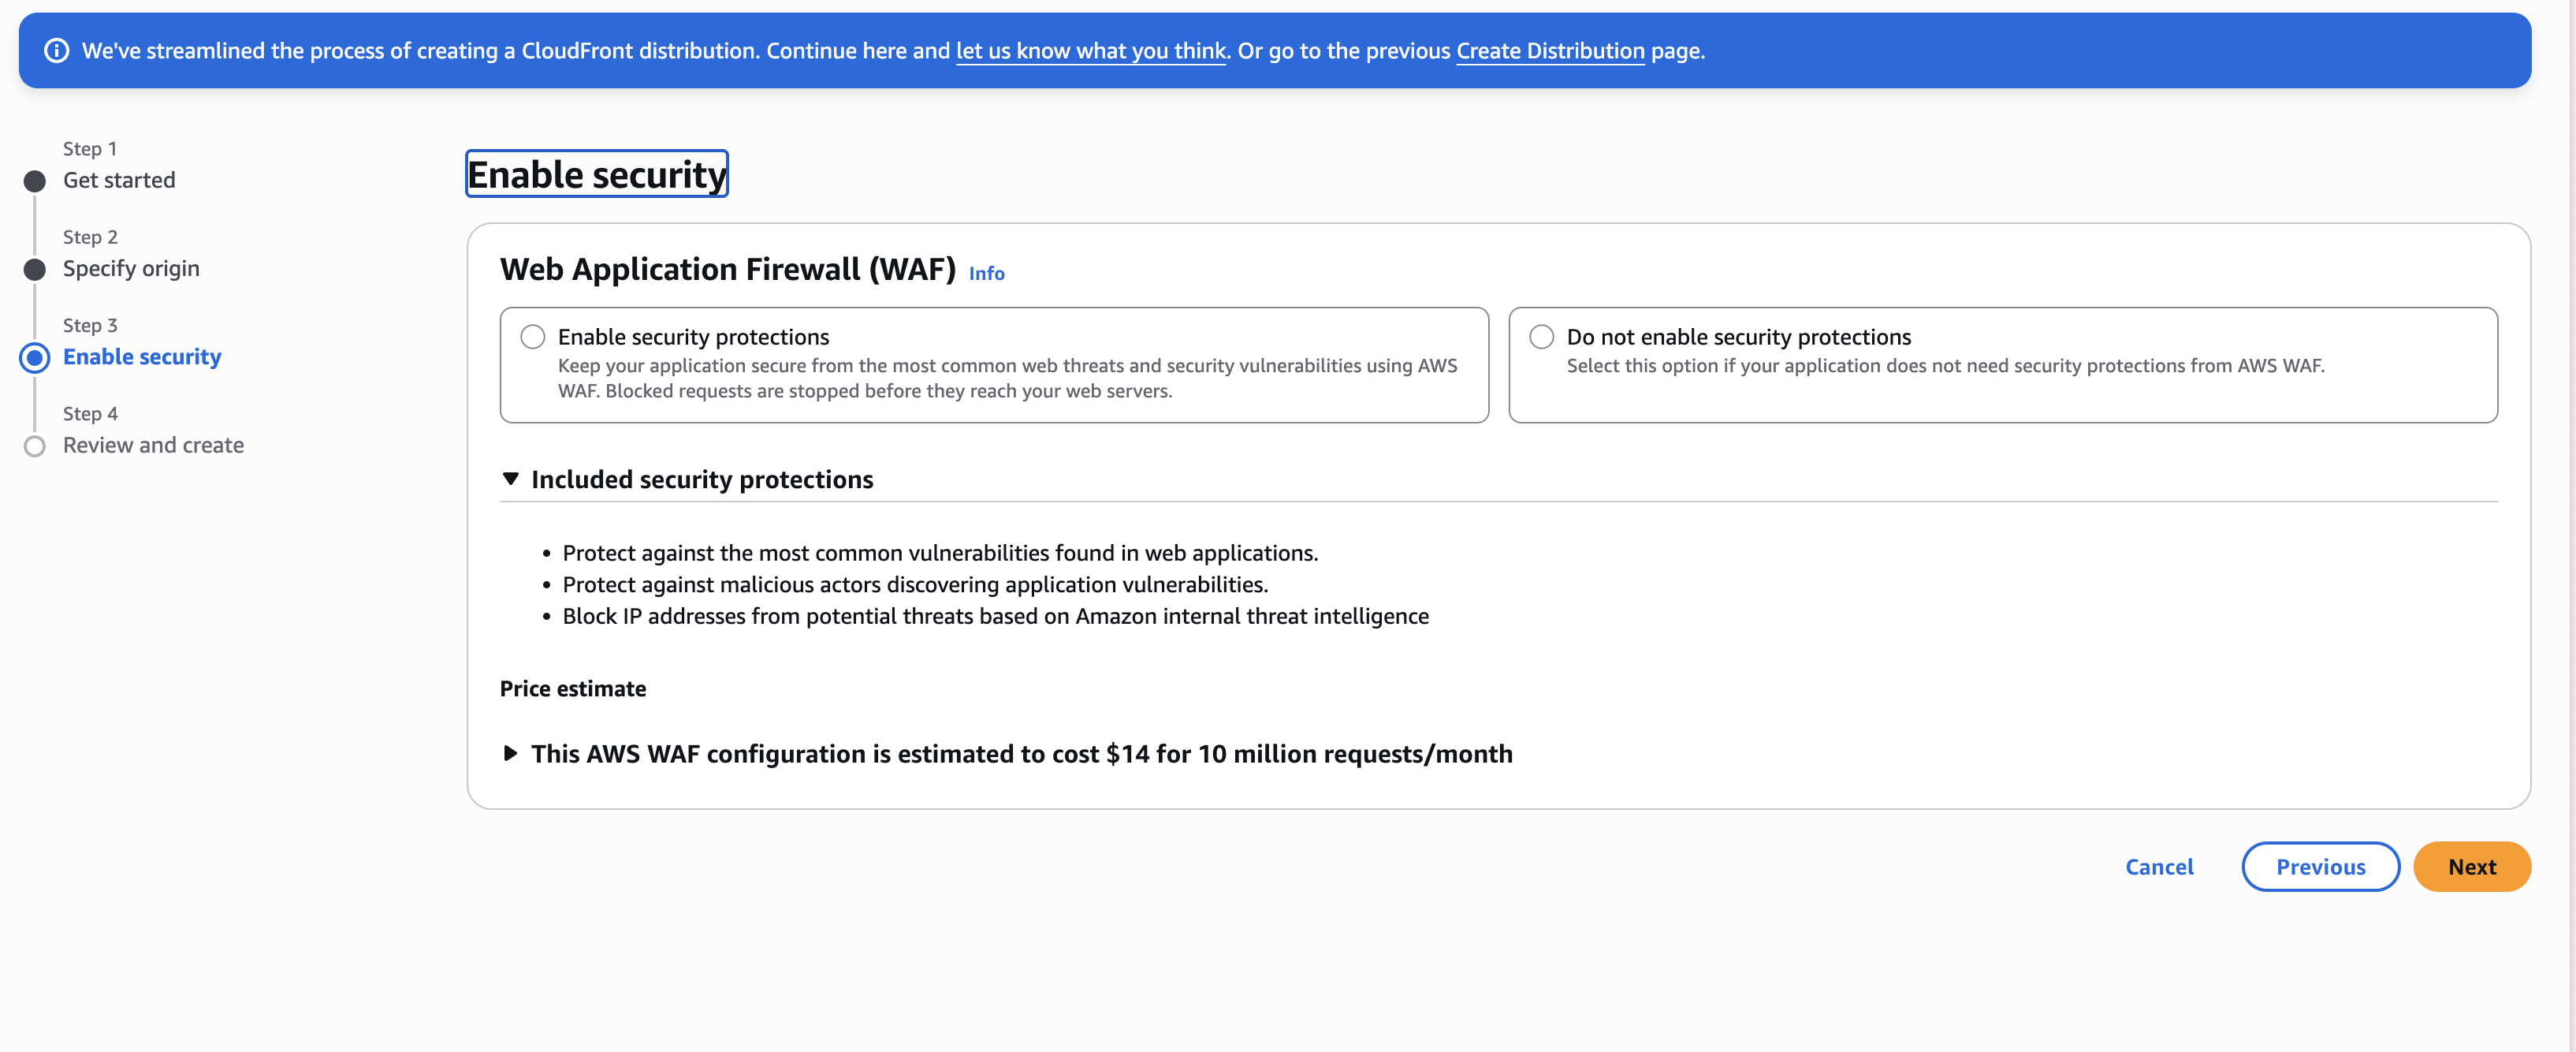
Secure Allowlist Endpoints
This feature adds a security layer to verify that the API request originated from Fyno by generating Signature using HMAC key. You can leverage this feature when you call your APIs from workflows and also when you receive delivery reports from Fyno to your endpoint.
The signature will be included in the API request header as X-fyno-hmac-signature.
To enable the Secure Allowlist Endpoints feature for your account,
Fyno will use the secret key to encrypt the JSON payload (using SHA-256 algorithm) and create a signature and send it as part of the API request header. The customers can then decrypt using the Key to check if the payload remained intact and not corrupted.
How to configure custom media storage
This feature enables you to store media files sent using Fyno’s PDF component or any incoming media (like jpeg, png, pdf etc) received from your customers via WhatsApp in your private S3 bucket to make sure all the media file are secure. ¸
The prerequisite for enabling secure media storage is to Create custom AWS S3 storage.
How to Create custom AWS S3 storage

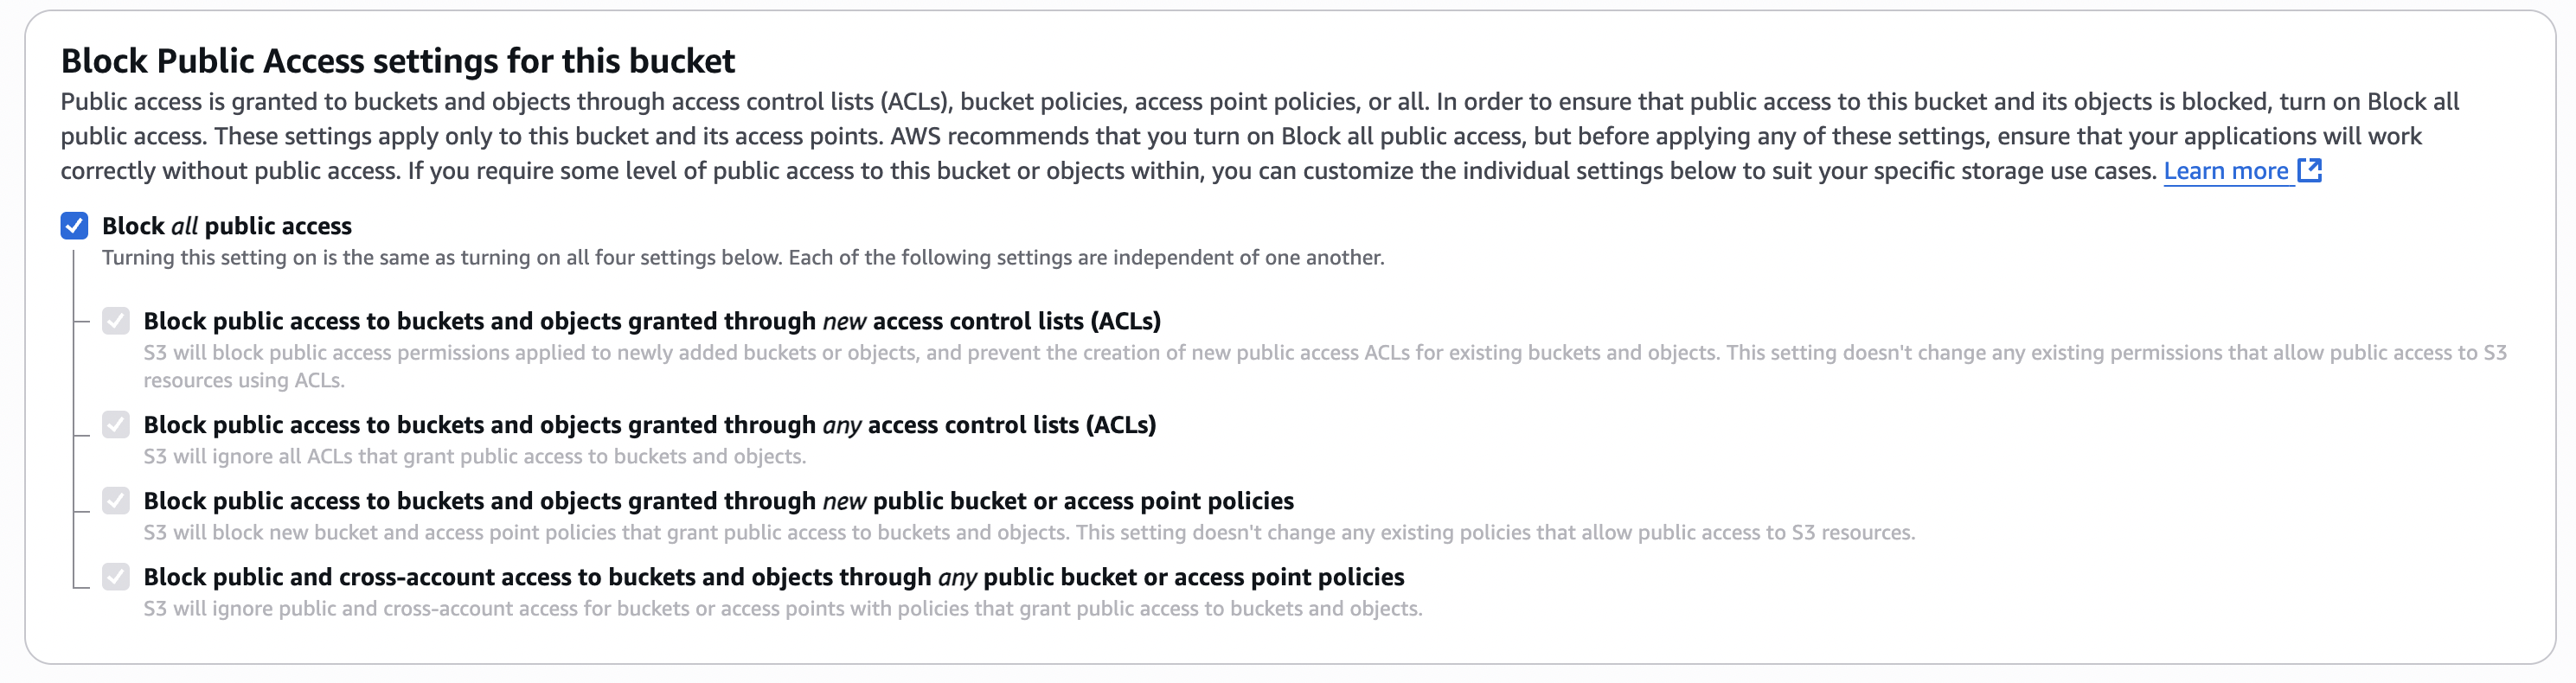


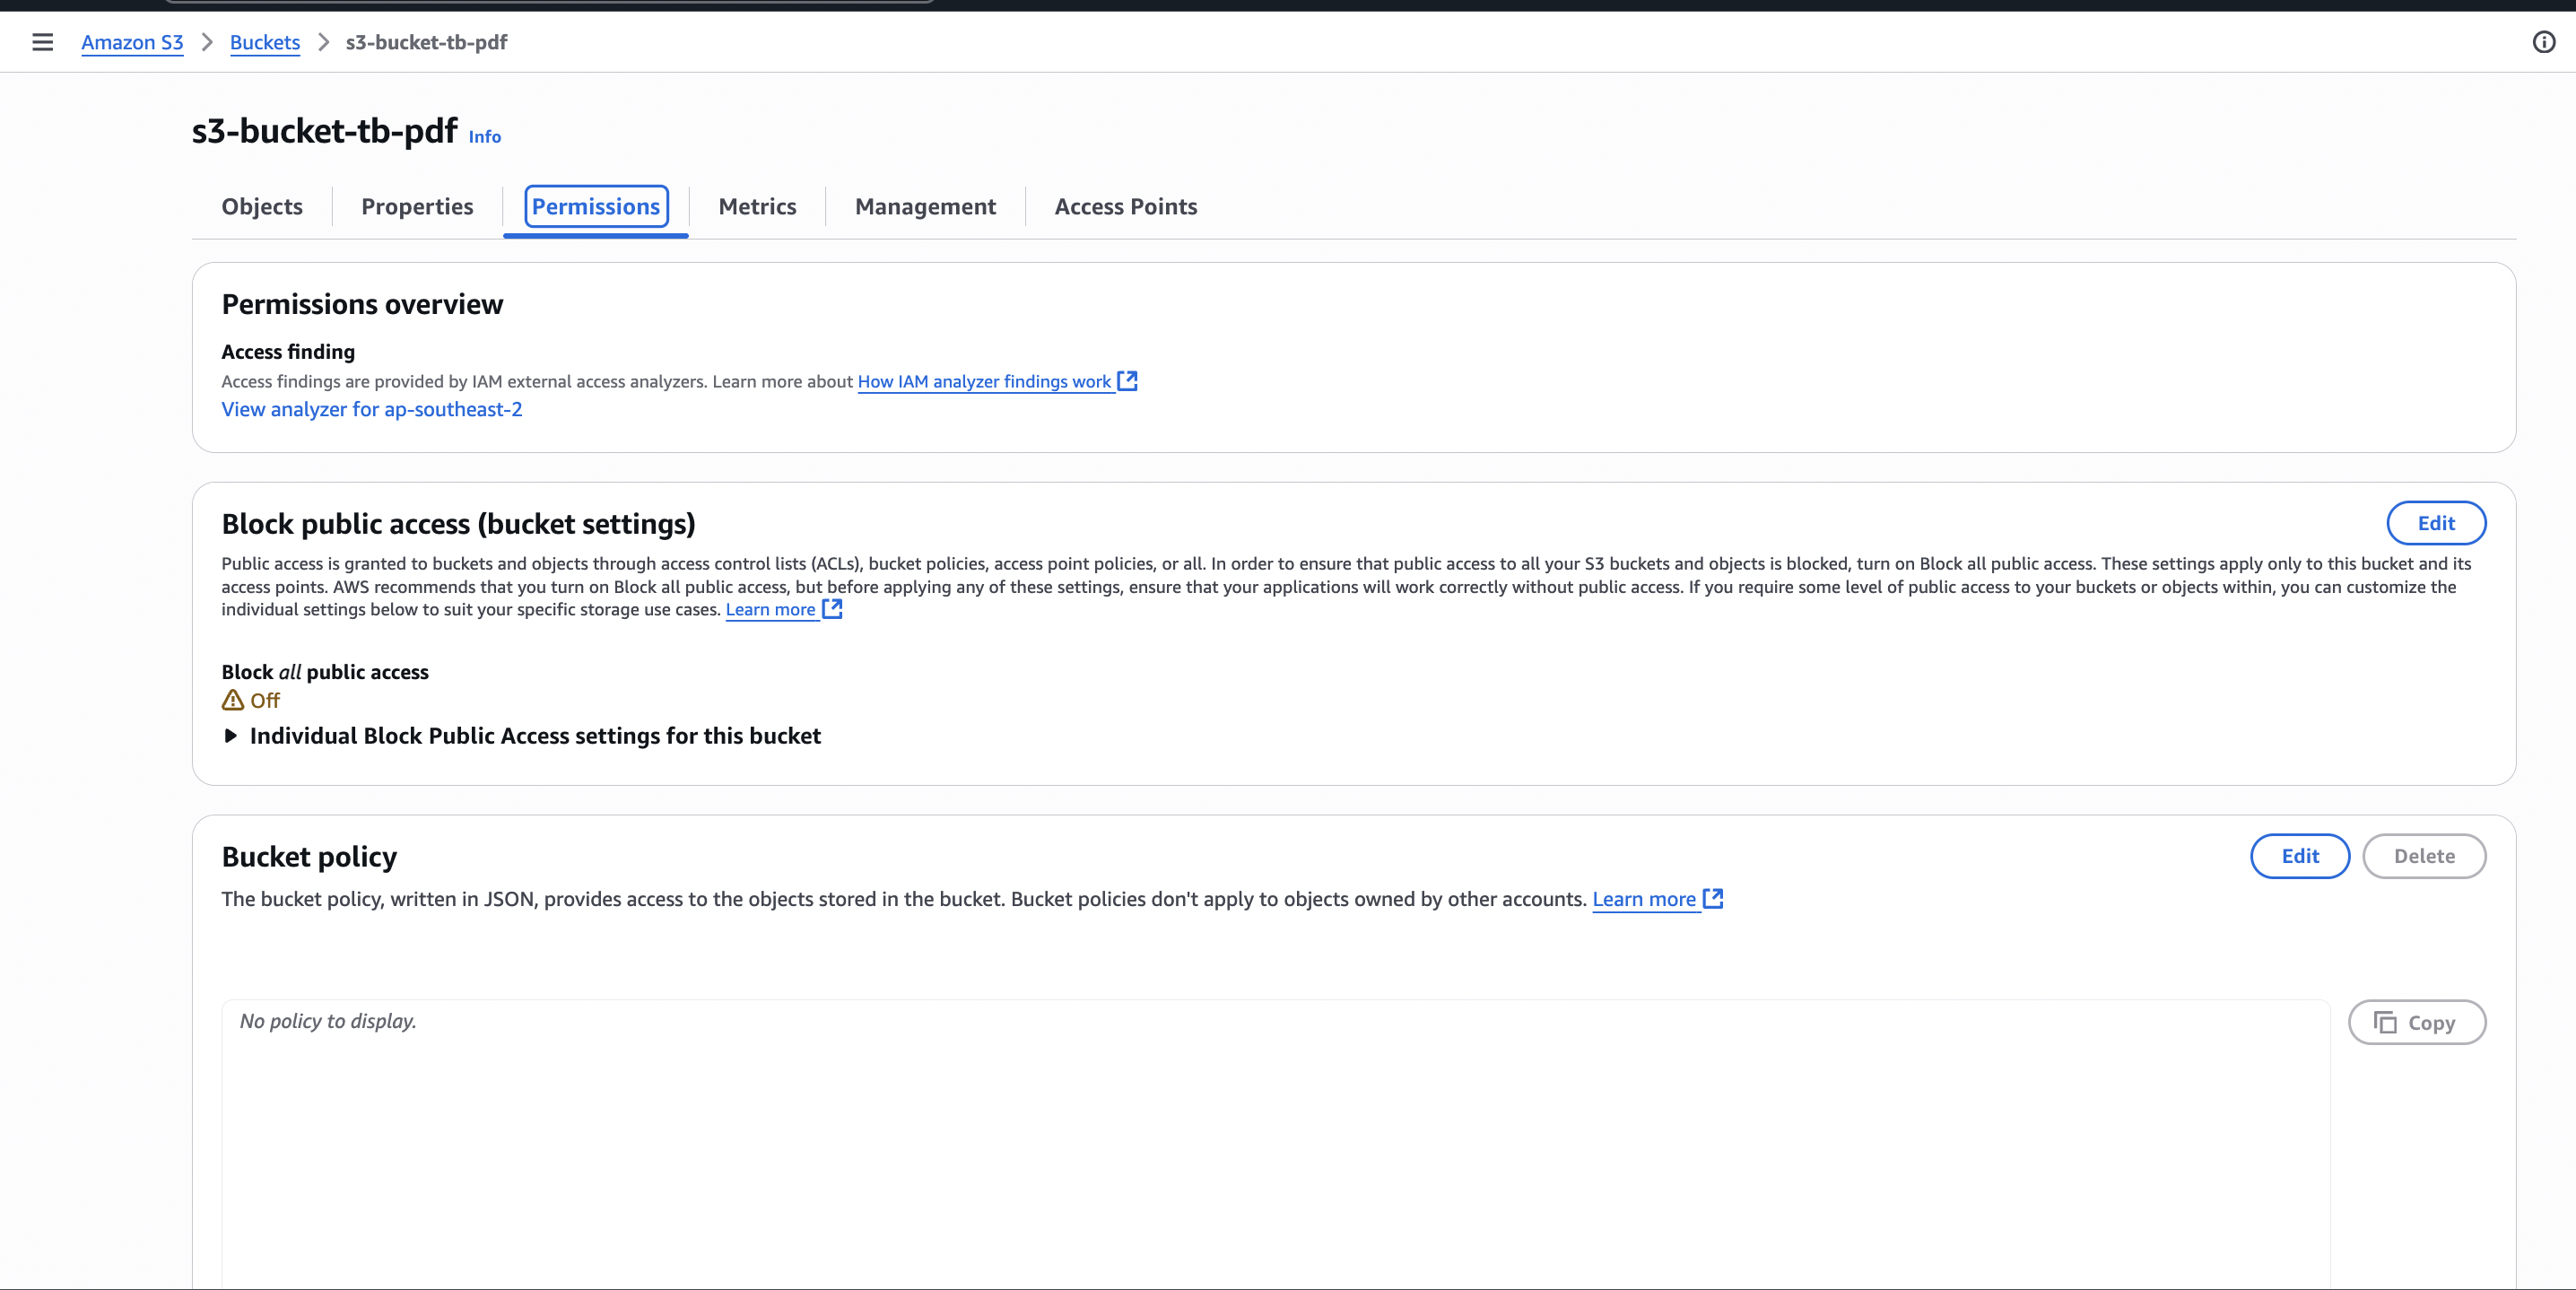

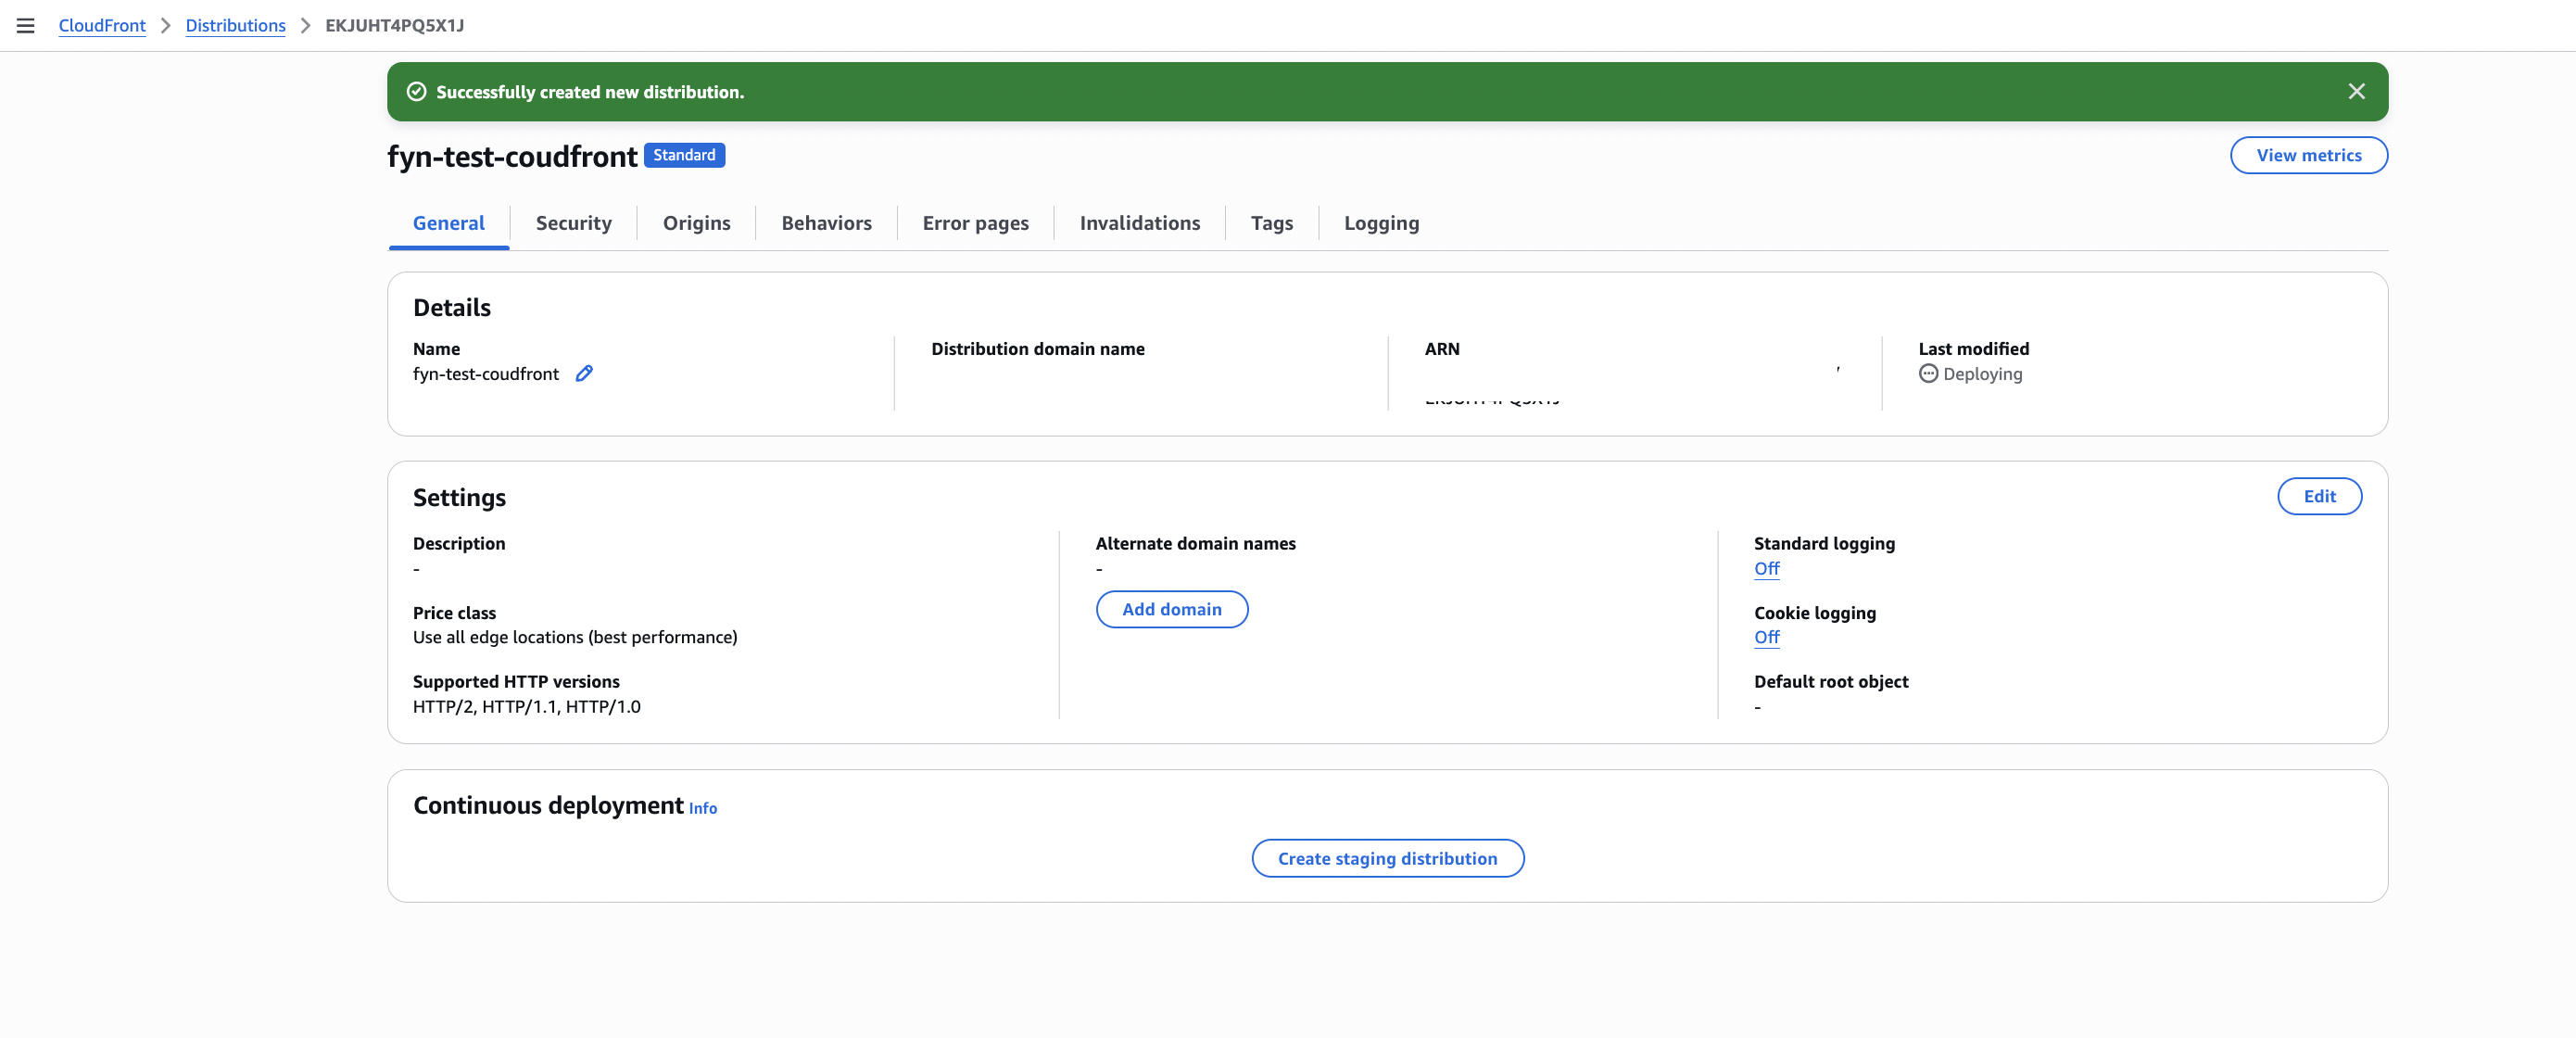
How to make S3 bucket private
To make the S3 bucket private, you need to create a Cloudfront URL and access the S3 bucket using it.

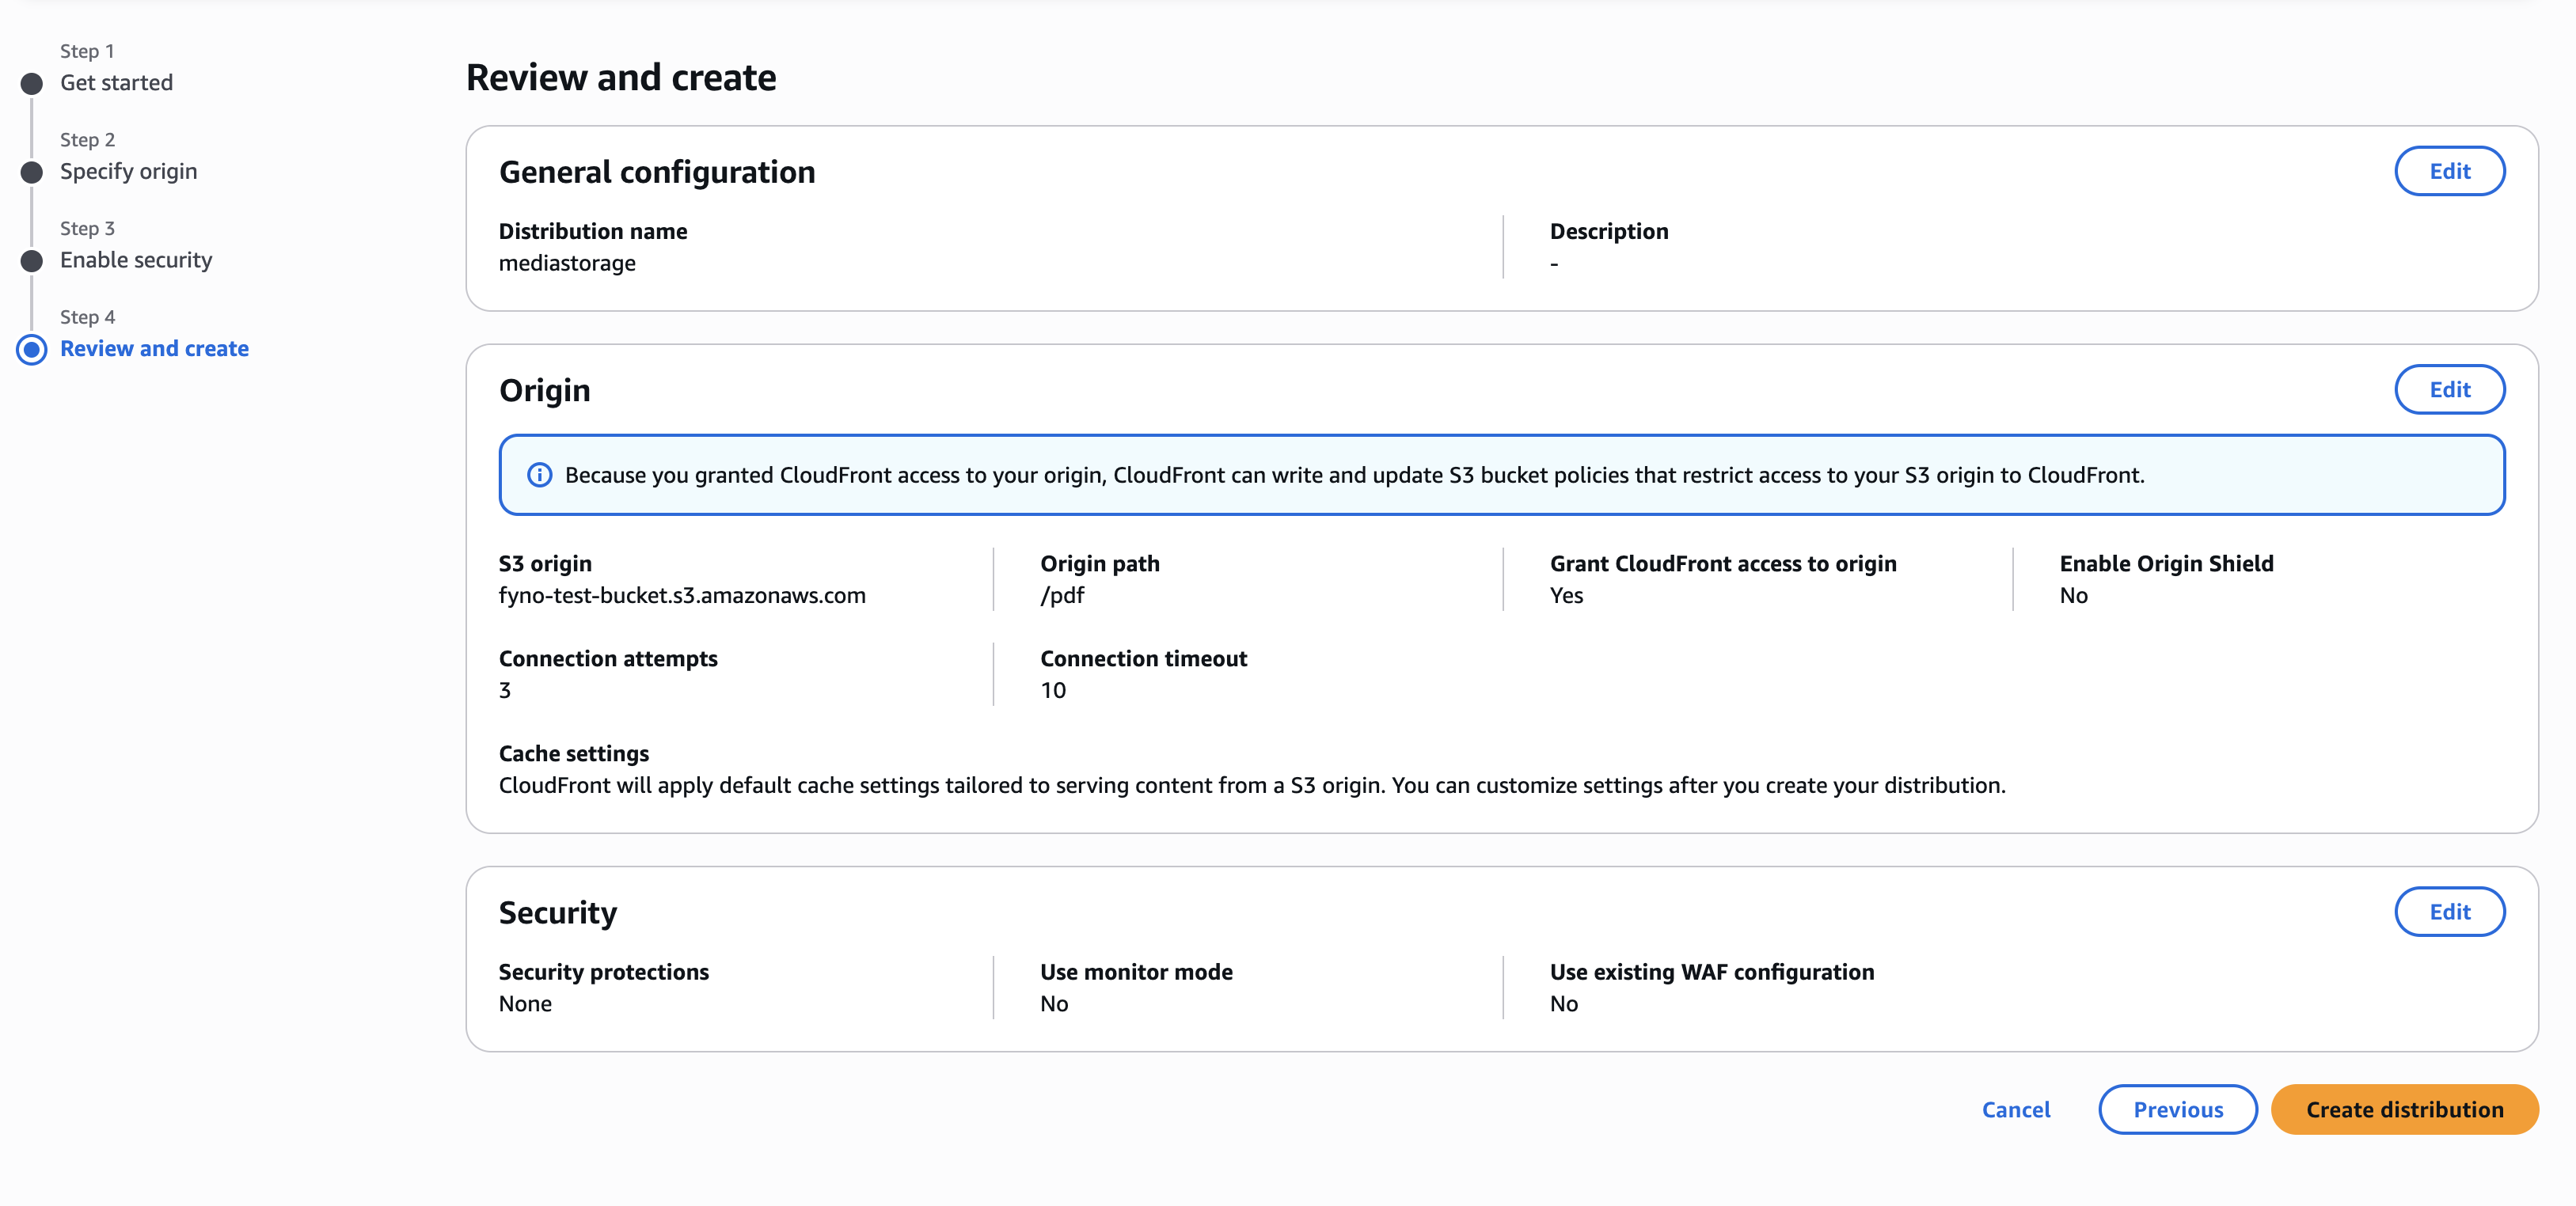
To enable the Secure Media Storage feature for your account,
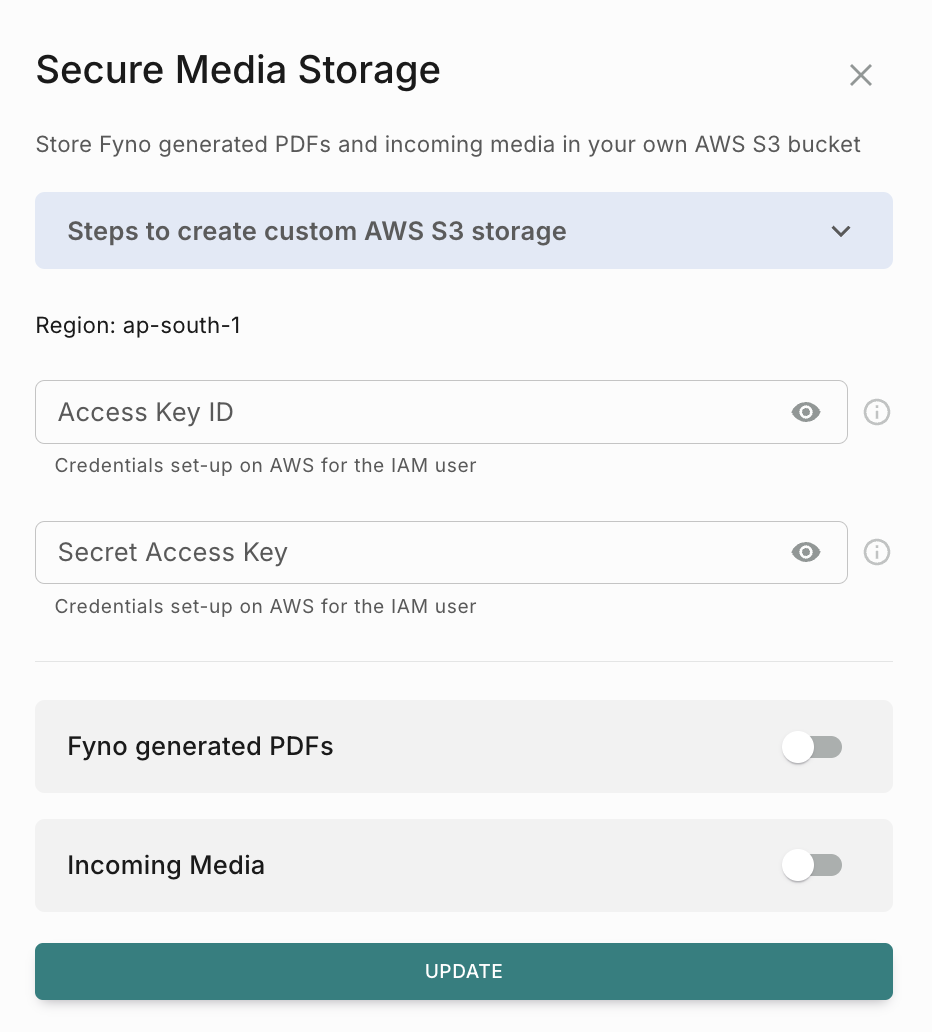
How to configure for Fyno generated PDFs
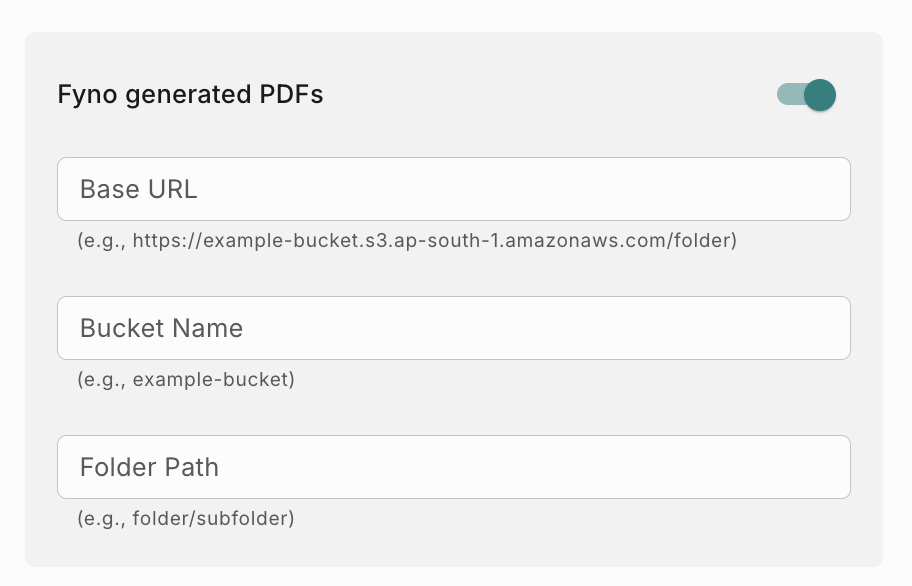
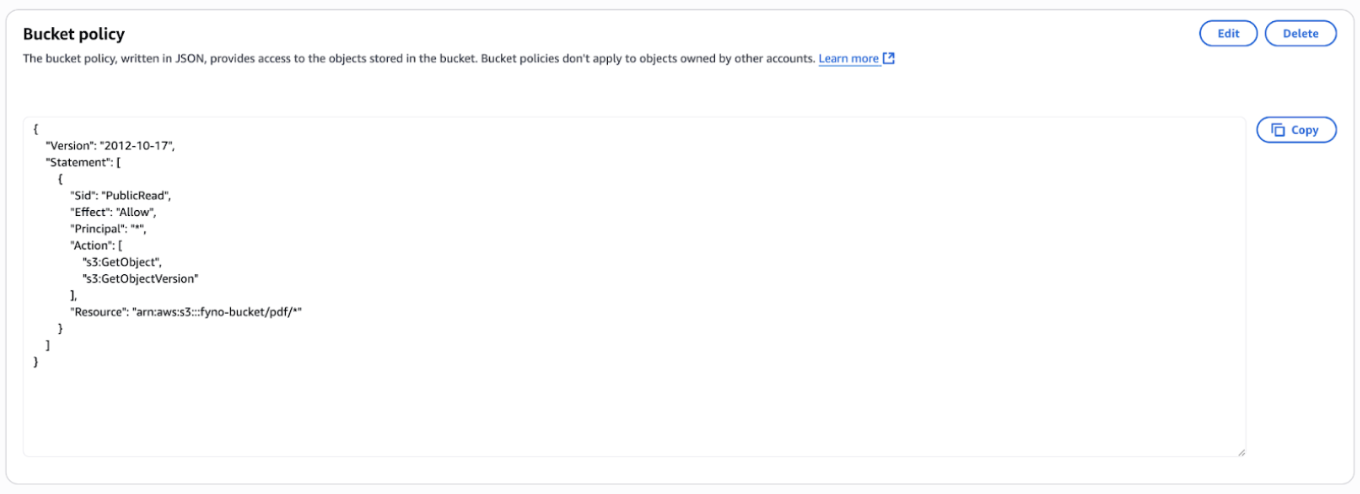
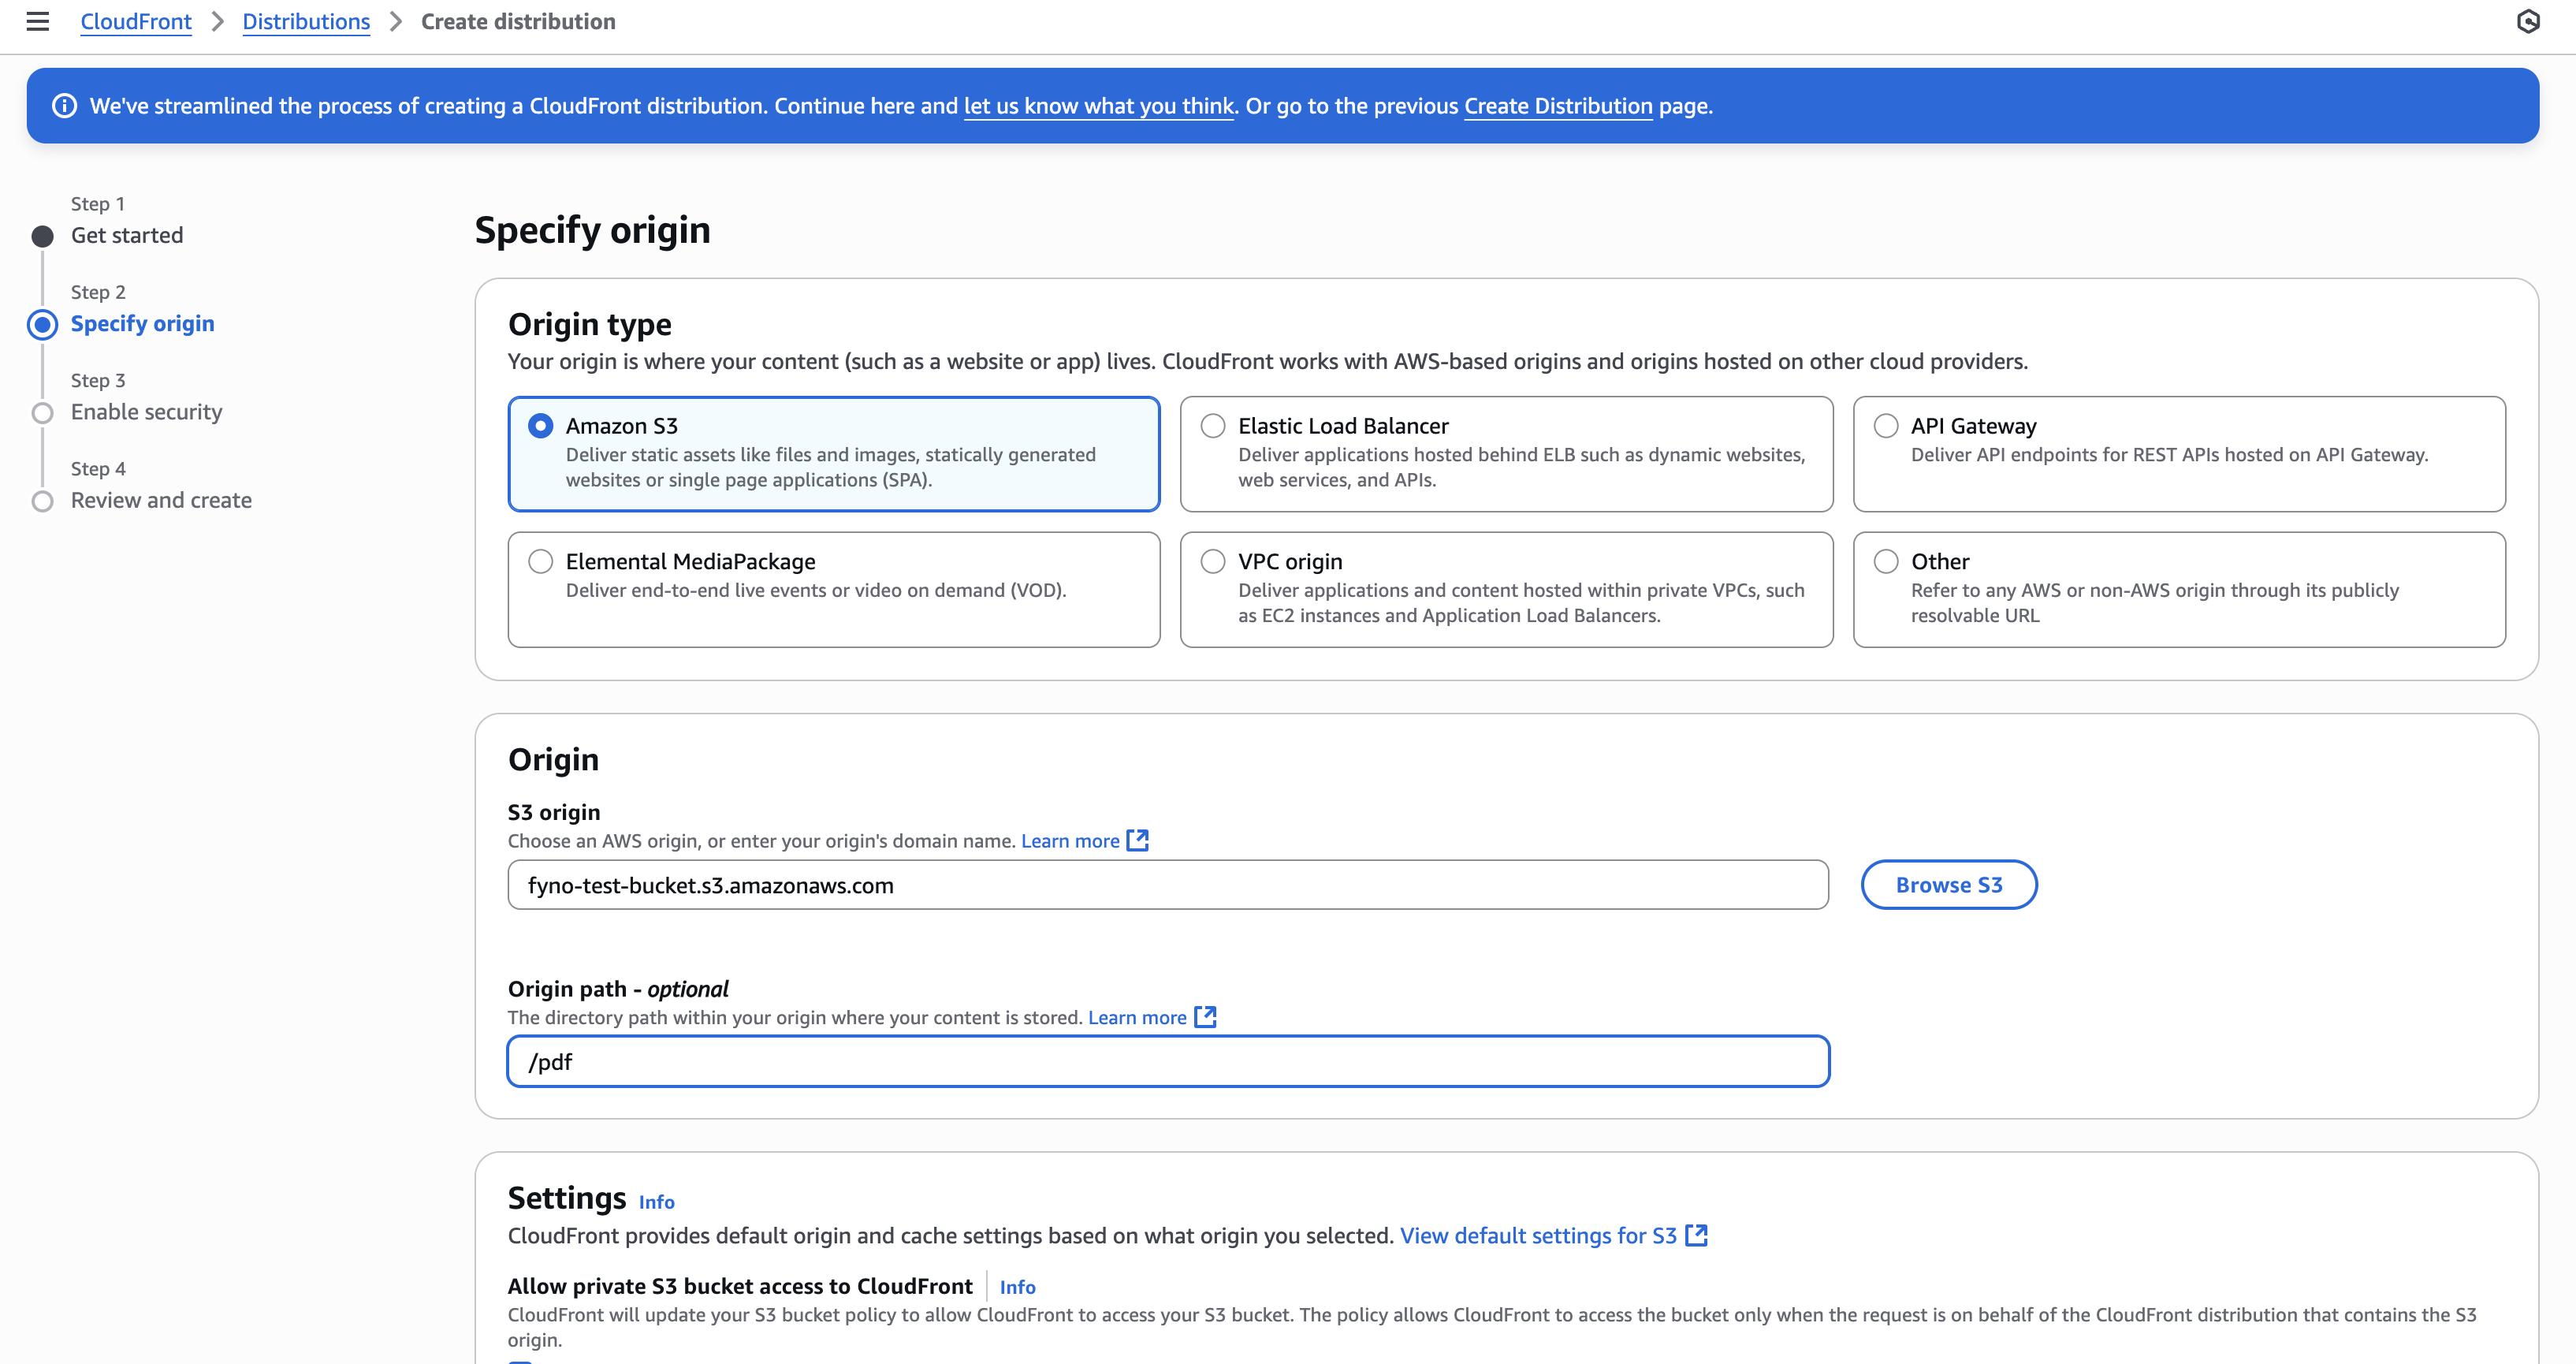
- Base URL : Provide the URL where the Fyno generated PDF files will be stored in this format - <base_url>/<folder>/<subfolder> Example - https://example-bucket.s3.ap-south-1.amazonaws.com/pdf/lrn . If you are using CloudFront URL to access S3 bucket and if you have added origin path as /pdf, then you need to add <Distribution_Domain_name>/<subfolder>. Example - abcdefgh.cloudfront.net/lrn
- Bucket Name : Provide the bucket name where the files will be stored.
- Folder Path : Provide the Folder path where the files will be stored. Example - pdf/lrn.
How to configure for Incoming Media

- Base URL : Provide the URL where all the incoming media files (pdf, jpeg, png etc) will be stored in this format - <base_url>/<folder>/<subfolder>. Example - https://example-bucket.s3.ap-south-1.amazonaws.com/incoming/media . If you are using CloudFront URL to access S3 bucket and if you have added origin path as /incoming, then you need to add <Distribution_Domain_name>/<subfolder>. Example - abcdefgh.cloudfront.net/media.
- Bucket Name : Provide the bucket name where the files will be stored.
- Folder Path : Provide the Folder path where the files will be stored. Example - incoming/media.
Authentication
Fyno supports multiple authentication mechanisms to securely manage access across organizations.
Supported Authentication Options
Social Login (Google, Microsoft)
Social Login enables authentication using third-party identity providers such as Google and Microsoft.
This method simplifies credential management and accelerates user onboarding by eliminating the need to create and remember separate passwords.
SAML Single Sign-On (SSO)
SAML-based Single Sign-On (SSO) allows authentication through an organization’s existing Identity Provider (IdP), offering centralized access control and enhanced security.
Users can log into Fyno using corporate identity tools such as OKTA, AWS, or other SAML-compliant IdPs.
Once SSO is enabled, all workspace members are redirected through the IdP login flow, ensuring secure and policy-driven access management across the organization.
To learn more, visit the SAML Single Sign-On (SSO) documentation.
Important Note:
SAML SSO is available only on the Enterprise plan.
To enable SSO for your organization, contact Fyno Support at support@fyno.io.
Support assistance includes:
- Enabling SAML SSO for the account.
- Providing a step-by-step setup guide based on your company’s IdP.
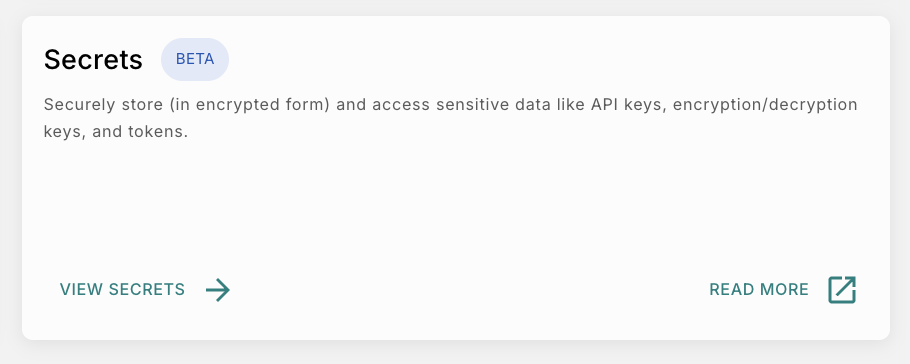
##Secrets
The Secrets feature provides a secure and centralized way to store sensitive information that may be required across the platform. Currently, Secrets are used with Allowlist encryption configurations, where encryption keys can be securely stored and referenced during endpoint configuration.
 This approach improves security because the actual key value is encrypted and stored securely, while only a reference to the secret is used within the configuration.
For example, if you need to configure AES encryption for an Allowlist endpoint, you can:
- Store the encryption key in Secrets.
- Select the stored secret while configuring encryption in Allowlist.
Storing keys in Secrets helps ensure that sensitive credentials remain encrypted, protected, and centrally managed.
Advantages of Using Secrets
Using Secrets provides several advantages:
- Secure Storage: Securely stores encryption keys and other sensitive credentials.
- Data Encryption: Encrypts secret values before they are stored.
- Exposure Prevention: Prevents accidental exposure of sensitive information.
- Centralized Location: Allows credentials to be managed from a single location.
- Key Rotation: Simplifies key rotation and credential updates.
- Secure References: Enables secure referencing of secrets without exposing actual values.
- Reduced Duplication: Reduces duplication of sensitive credentials across configurations.
Permissions
Only users with Owner or Super Admin roles can:
- Access Secrets.
- Create new secrets.
- Modify existing secrets.
- Delete secrets.
Secrets Page
The Secrets page provides a centralized location to manage all saved secrets.
 At the top of the page, a search bar allows users to quickly locate secrets by name. The Store New Secret button opens a modal where new secrets can be securely added.
Secrets List
The main secrets list displays:
- Secret name
- Description
- Last updated time
- Created date
Each secret also includes an action menu that provides management options such as editing, viewing change history, or deleting the secret.
Store a New Secret
Click Store New Secret to open the secret creation modal. This modal allows users to securely create and save a new secret.
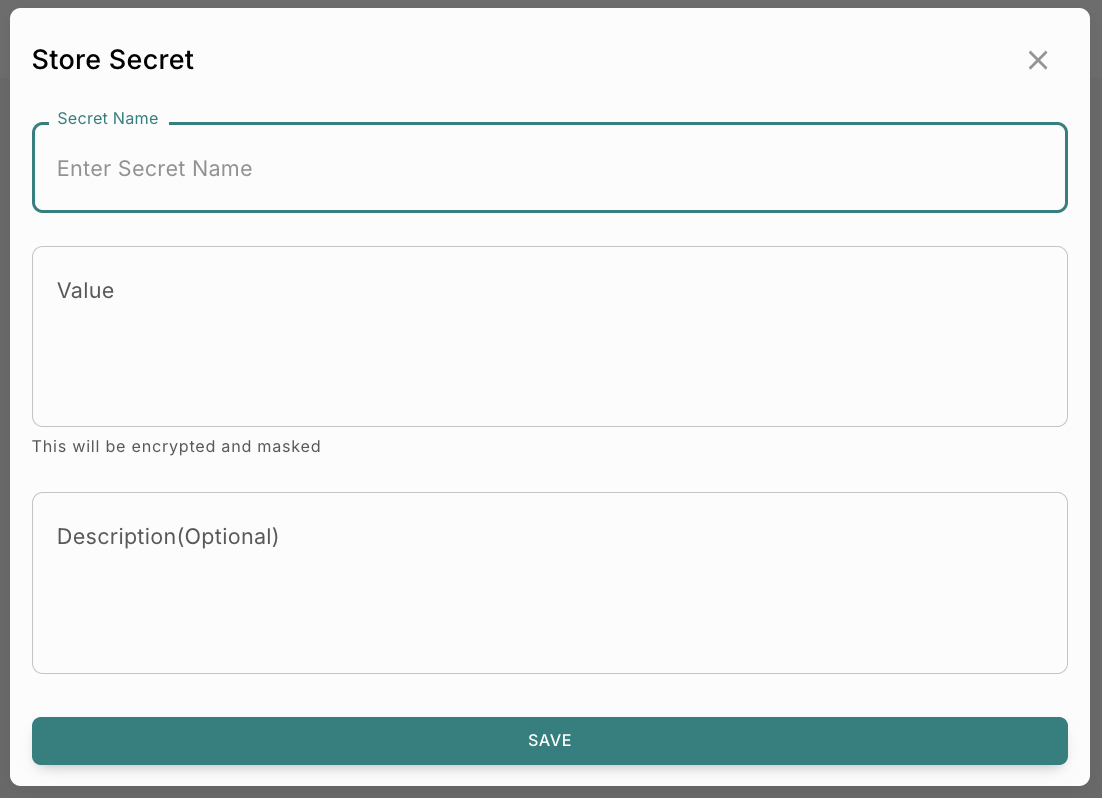
Secret Name
The Secret Name field is used to define a unique identifier for the secret. This name is used when selecting or referencing the secret in supported configurations, such as Allowlist encryption settings.
- Example:
payment-api-key
Examples of Recommended Naming:
production-aes-keystaging-encryption-keypayment-api-keywebhook-signing-secret
Value
The Value field contains the sensitive information being stored. This may include:
- API keys
- Access tokens
- Client secrets
- Passwords
- Private credentials
Once saved, the value is encrypted and masked to prevent unauthorized visibility.
- Example:
sk_live_xxxxxxxxxxxxxx
Description (Optional)
The description field allows users to provide additional context about the secret. This can help teams understand:
- What the secret is used for.
- Which integration it belongs to.
- Whether it is intended for development or production use.
- Example:
Production payment gateway API key
Save
Clicking SAVE securely stores the secret in the platform.
Important Post-Save Rules:
- Encryption keys must be saved as Secrets before they can be used in an Allowlist configuration. Direct entry of encryption keys is not supported.
- After a Secret is created, its value is encrypted and cannot be viewed again in plain text.
- Only the encrypted representation of the Secret is displayed, so ensure the original value is stored securely before saving it.
Using Secrets in Allowlist Encryption
Secrets are currently supported within Allowlist encryption configurations. Endpoint encryption keys must be referenced from Secrets. Direct entry of encryption keys during endpoint configuration is not supported.
Example Workflow
Managing Existing Secrets
Change Logs
The Change Logs option displays the history of modifications made to the secret. This helps with:
- Auditing changes
- Tracking updates
- Monitoring secret activity
- Reviewing configuration history
Delete
The Delete option permanently removes a secret from the system.