Team
Team Management and Access Control in Workspace
Team is a structure that Fyno built for you to work and collaborate effortlessly with your colleagues / teammates. But in order to understand how the Team function works, we will first need to understand what a Workspace is and how that functions. Read more here. The structuring and functioning of a Team works based on roles and policies assigned to each team member.
On signing up and creating a new account with Fyno, your Default Workspace is created and the registered email ID becomes the Organisation Owner.
What you can do with Teams
Team(s) allow you to:
- Provide restricted access to individual employees as per their role requirements.
- Have a centralized view of the team members along with their access levels and details.
- Collaborate easily with colleagues on projects and tasks within the Fyno application.
How Access Control Works
Access in Fyno is managed using two layers:
-
Roles (Base Access): Every user is assigned a role that defines their default level of access across the platform.
-
Add-On Policies (Additional Access): Add-on policies allow you to grant specific capabilities on top of a role. This helps avoid assigning broader roles when only limited additional access is required. This is optional and can be used only when additional permissions are needed.
Add-on policies can be assigned:
- During user invitation.
- While modifying an existing user.
This enables flexible and controlled access management across teams.
Roles
The below roles with unique levels of access have been created so that you can assign relevant roles to each person, based on what they need to access.
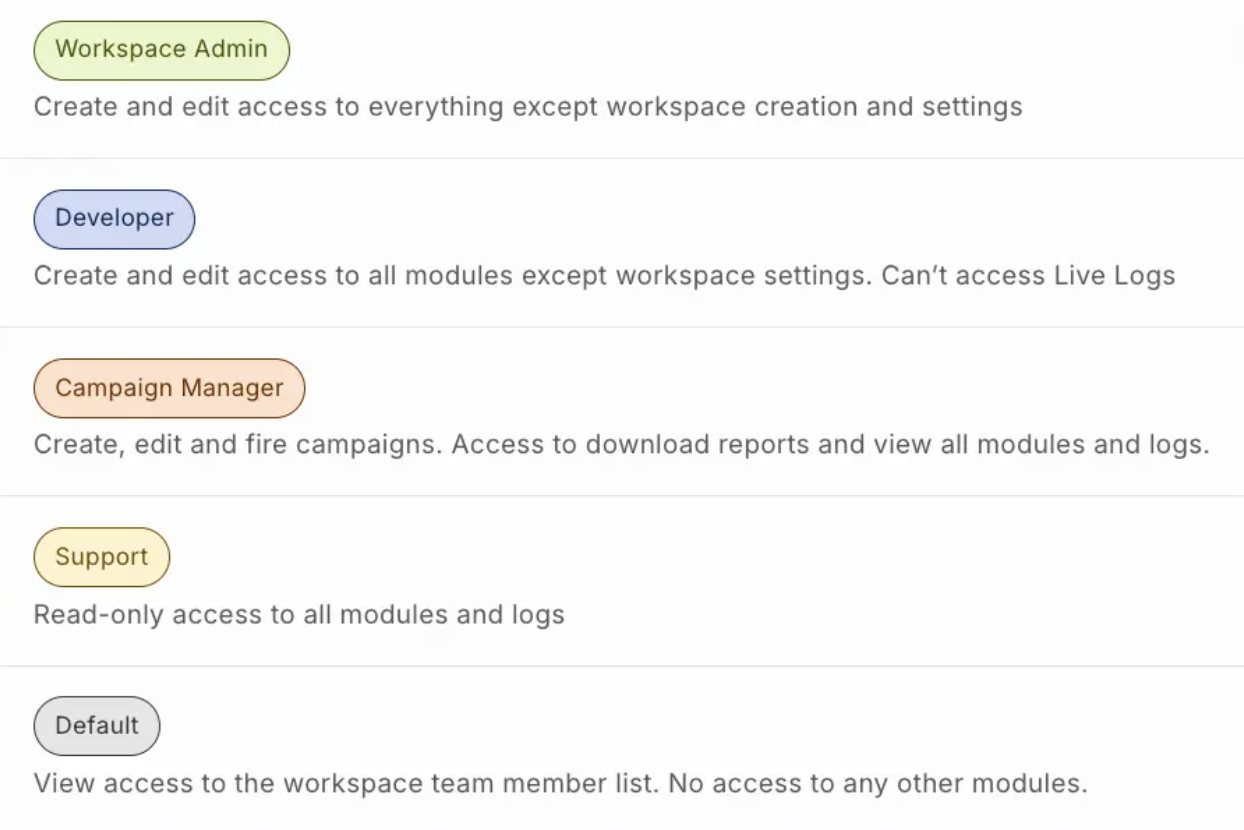
Roles & Permissions
Additional Notes
- Owner, Super Admin, and Workspace Admin have broad access across most features and can perform high-level administrative actions.
- These roles can also unmask and view details within User Profiles.
- To unmask the details, navigate to the required profile after logging in with the respective role and click the eye icon available on the profile.
- Each workspace can have only one Owner.
- Only the Owner can add Super Admins, and any Super Admin added by the Owner will automatically be added to all workspaces under that Owner.
- Certain permissions may vary by feature (for example, test-only access, view-only access, or restricted actions like Go Live / Fire), as detailed in the table above.
Add-On Policies
Add-on policies provide fine-grained control over specific actions.
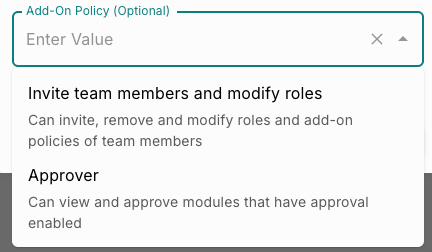
They are useful when a user needs limited administrative capabilities without being assigned a higher role.
Invite Team Members and Modify Roles
This policy allows a user to:
- Invite new team members
- Remove users
- Modify roles
- Assign or update add-on policies
This is typically assigned to IT or operations teams responsible for onboarding and access management.
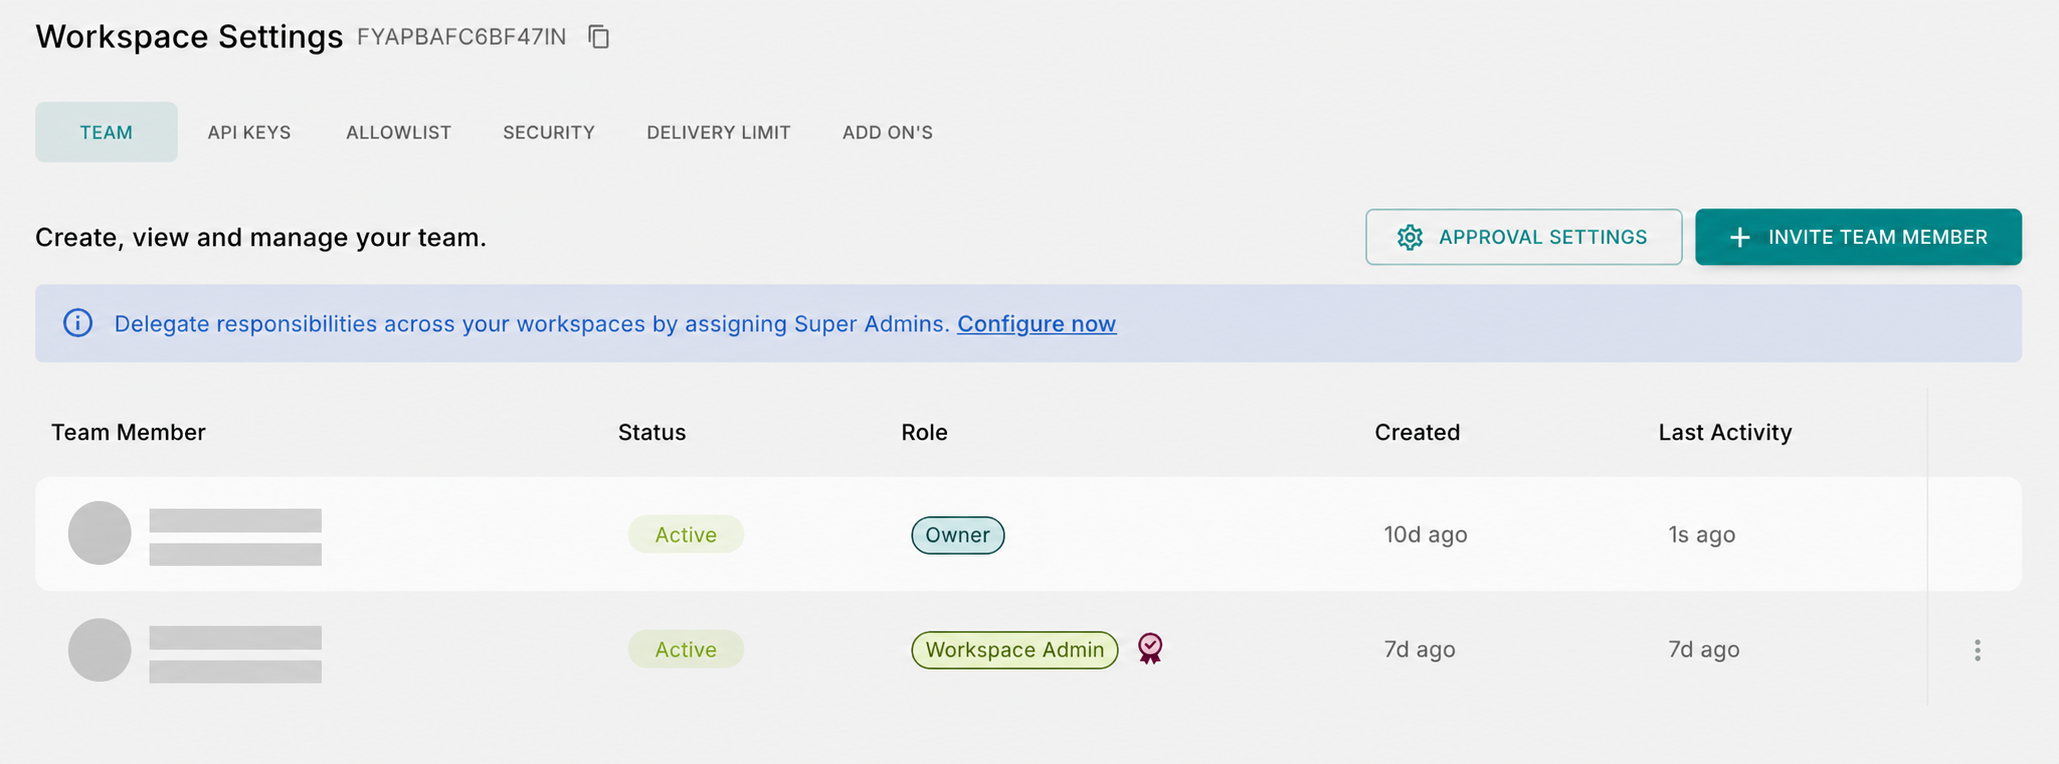
Inviting and Viewing Team Members
To create a new team member, follow the below steps:

- From your Fyno account, click on the Workspace Settings icon from the bottom left side of the navigation menu.
- Navigate to the Team tab.
- Click
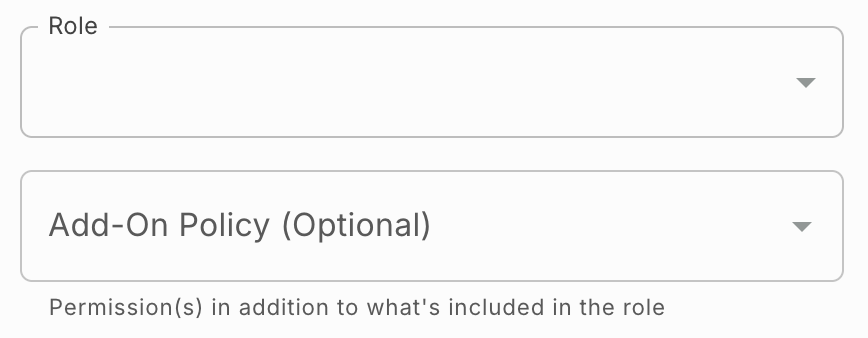
+ Invite Team Member. - Enter the user’s Email ID.
- Select a Role based on the level of access required.
- Optionally attach Add-On Policy to the user.
- Click
Send Invite.
The newly invited colleague will receive an email with details to sign up on the Fyno application.
You can invite new members to collaborate within your workspace by following these steps.
Role Assignment Rules
- Owner can assign any role.
- Super Admin can assign Workspace Admin, Developer, Campaign Manager, Support, or Default roles.
- Workspace Admin can assign Developer, Campaign Manager, Support, or Default roles.
- Add-on policies can be assigned during invitation or updated later.
Modifying Roles and Add-on Policies
You can update a user’s role and policies after they have been added.
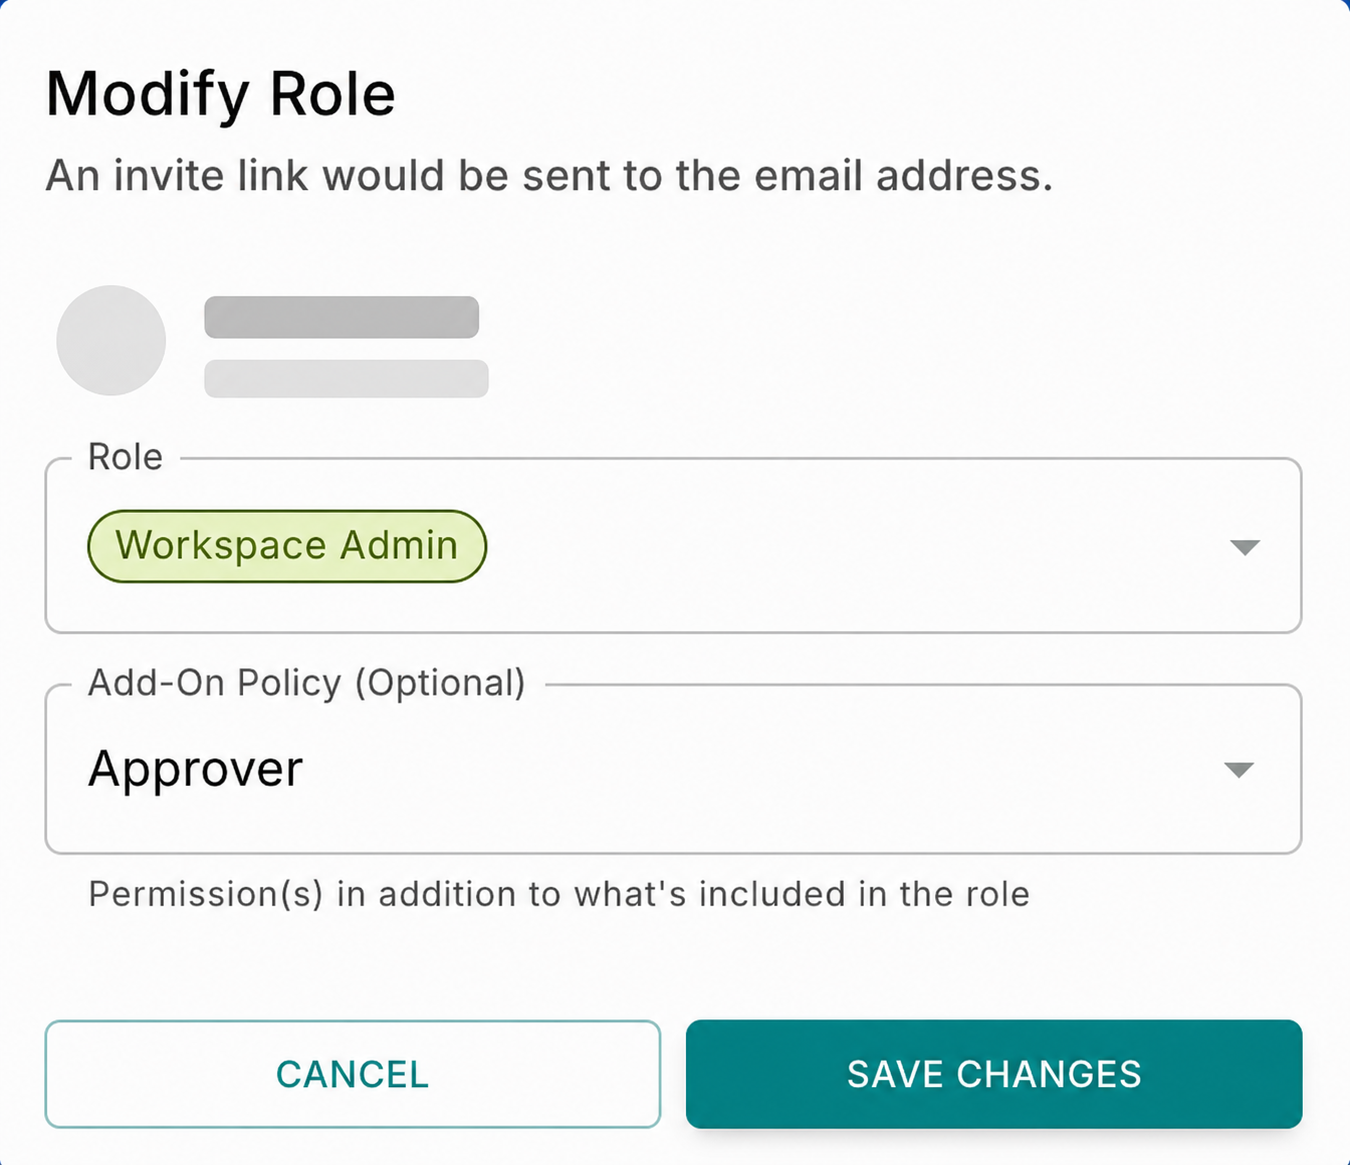
Note: These updates are permission- and role-specific, ensuring changes only affect the selected user’s access and do not impact other users or settings.
Steps:
- Navigate to Team from Workspace Settings.
- Locate the user in the list.
- Click the three-dot menu next to the user.
- Select Modify.
- Update the role and/or add-on policies.
- Save the changes.
All role and permission updates are managed through the three-dot menu to ensure controlled access and avoid unintended changes.
Deleting a Team Member
To delete a team member from your workspace, follow the below steps:
- From your Fyno account, click on the Workspace Settings icon from the bottom left side of the navigation menu.
- Select Team.
- Click the three-dot menu next to the user.
- Select Delete.
- Confirm the action.
Note: This action is role- and permission-controlled. Only users with the appropriate permissions can delete team members, and this action is permanent.
Approver
Users with the Approver policy can:
- Access the Approval Requests page
- View all requests assigned to them across modules
- Review and take action (approve/reject) on those requests
They do not have direct access to modules, unless explicitly granted through another role.
Approval Settings
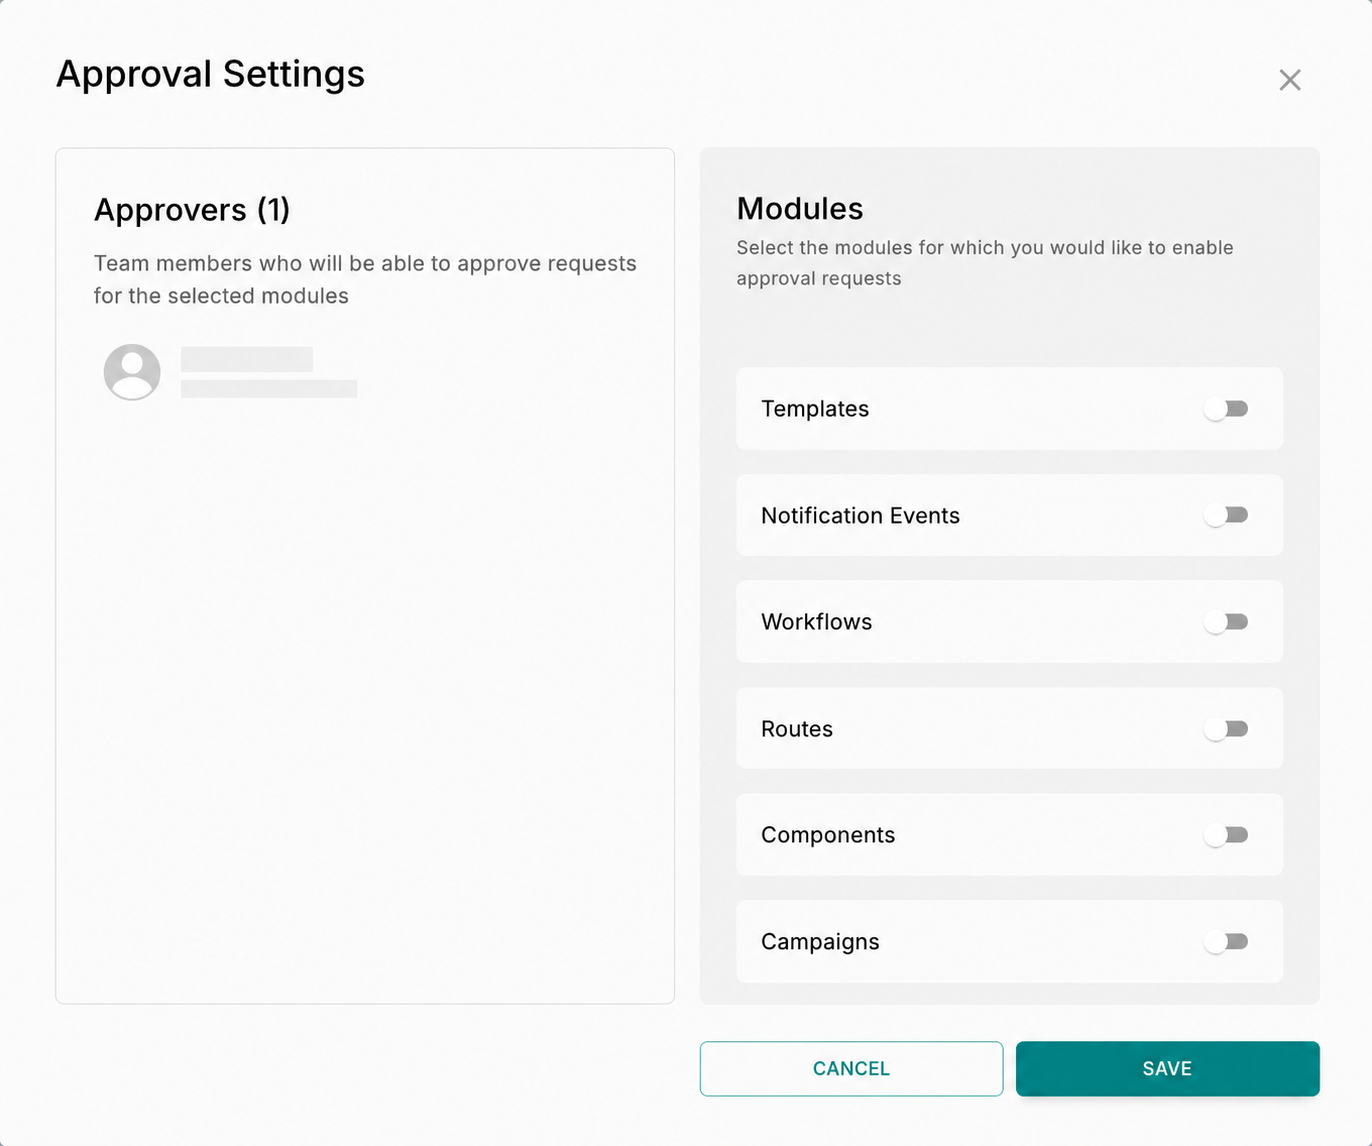
To enable Approval settings:
- From your Fyno account, click on Workspace Settings and navigate to the Team tab.
- Click Approval Settings.
- On the left-hand side, you will see a list of team members who have been assigned the Approver policy. At least one approver must be present to enable approval requests.
- On the right-hand side, enable approval requests for the required modules, such as:
- Templates
- Notification Events
- Workflows
- Routes
- Campaigns
Once enabled, any changes made in the selected module will go live only after the assigned approver(s) approve the changes.
- Select the number of approvals required for each module. You can select up to 5 approvers.
For example, if 2 approvers are selected for Templates, any changes made to Templates will go live only after both approvers approve the changes.
- Click Save.
You can read more about it here
Important Pointers for your Reference
- Roles define baseline access, while add-on permissions provide additional capabilities.
- Certain actions, such as inviting users or modifying roles, require explicit permissions.
- Features may be disabled or hidden if access is not granted.